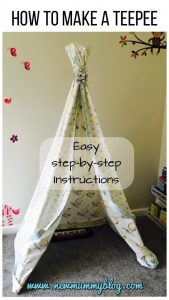
I made this toddler teepee tent for H last Friday, and it was really easy and quick to make. You might have seen my Happy List post which mentioned it, well, sorry for the delay, here are the instructions on how to make a teepee tent yourself, and you don’t even have to sew it (but you can do I tiny few stitches if you wish!)! I’ve been thinking about making a teepee tent for kids for a while and finally went for it.


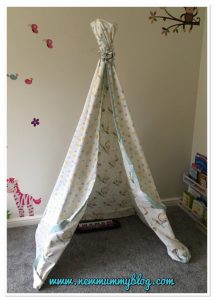

Toddler H is 2 (27 months old) and so I thought making a teepee tent might help with downtime, maybe encourage a nap and be something new for her to snuggle down in when she needs to.
Step-by-step instructions…
How to make a teepee tent for kids or a toddler!
Supplies for making a teepee
- A king size duvet cover
- 6ft garden sticks (or doweling!)
- string or ribbon
- pillows
- needle and thread (if you wish!)
- sticky tape (or any kind of tape that will hold the sticks together
Notes on supplies: I chose the pack of sticks that were thickest and straightest.
How to make a teepee tent
1. Planning
Firstly plan out your teepee size. I used the square tiles on our kitchen floor to make the teepee square. Lightly tie the top of the sticks around 20cm from the top, and spread the bottom of the sticks out to make the teepee shape, with a base of your chosen size.


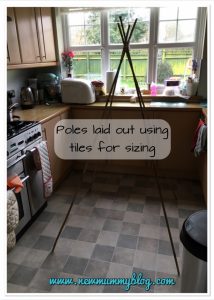

To make our teepee I used 6ft sticks and the base is 1m square.
Once the teepee structure is in place, wrap your string very tightly around the sticks to hold them in place. Then I used tape around the top of the sticks where they converge, taping in and around them too so that you cover all angles. It was surprisingly strong after adding the tape – make sure it’s tight and wraps around all the poles and in between them.
2. Drape your fabric to form the teepee
To make the teepee tent you want to drape the duvet cover over the sticks. Here is how I made, it but you might just want to try it yourself.
How I made the teepee – Hold the duvet cover and hold one edge around 30-40 cm from the corner. Hold it to the top where the sticks converge and drape the side of the duvet down the stick, allow a bit of overlap to form a door on the front. Then throw the rest of the duvet around the side, while holding that front piece firmly. Make sure the edge falls to the floor!
I’s say to leave 30-40cm from where the sticks converge so that you have a section of duvet that will go over the top of the sticks. To get it to fit on my 1m x 1m teepee I had to use the duvet at an angle. I think the duvet has to be at an angle to make the teepee doors fall nicely at the front.
I also tried finding the middle and draping it from the back. However you do it just make sure you hold the top of the duvet and gather it round (holding it tight as you wrap it round so that it is neat. Also make sure to nudge the sticks back into place if they move. It’s a bit trial and error. Having two adults doing this would probably make it much easier!


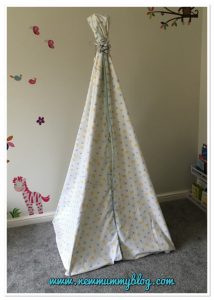

Try to make sure you make your teepee doors the same length to make it look even. (If you’re using a duvet like me you’ll have a pile of leftover duvet at the back).
I guess you could also use a kingsize flat sheet as it would be slightly bigger.
3. Secure the fabric
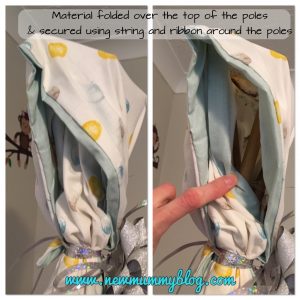
When you’re sure you’ve made your teepee fabric fit, and you’ve got doors falling nicely as well, wrap the fabric around the sticks, and then up and over the top to hide the sticks sticking out the top.
Then use your ribbon/string to secure the material tightly in place. Make sure you include the flap that covers the sticks when you tie it.
4. Neaten the teepee fabric and secure it around the poles
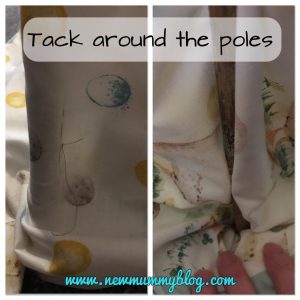
You’ll still be able to adjust the fabric, so even it up and smooth it out. Then use your needle and thread to tack a few stitches around the poles to make it a bit more secure. I did this half way down and near the bottom of each pole.
I was going to add some poles across the bottom to keep the teepee structure more stable, but it’s been up 6 days now and hasn’t fallen over yet. I’m really impressed with the teepee I made at this point as I don’t know how stable other teepees are, but the expensive one at our weekly playgroup falls down all the time. I think the tape at the top makes it more stable as the teepee at our playgroup doesn’t have anything at the top.
I had thought I would cut material at the back of the teepee and sew it nicely, but as it’s currently hidden it’s not making any difference and isn’t seen, I’ll leave it for now. This also means I’ll be able to adjust it in the future and possible even remake it using 5 poles if we move it into a corner (so that the space behind isn’t redundant). I also planned to sew the teepee poles in completely (not just tack them) so they weren’t exposed and, covering them completely (and at the ends would possibly make it safer). If you aren’t going to adjust yours in the future doing this might make it safer. I’ll definitely do this before Baby #2 is on the move as it would be a bit more risky then.
Toddler H loves her teepee and to be honest I haven’t had to adjust it at all. She has a few pillows and a throw on the floor and loves reading her books there and snuggling down. She even puts her dolls and cuddly toys there to sleep, which is very cute.
Disclaimer: I’m not sure how safe this teepee would be for some toddlers or young ones given it is large garden poles that are covered in a sheet. This is just what I have done and I can’t say anything about its safety.
If you choose to make a teepee after reading this tutorial, I hope it works well and your toddler loves it too! Share your teepee pictures with me on social media 🙂
Lynne



10 Comments
MMT
March 16, 2017 at 9:08 pmWow this is such a simple concept that I would never have thought of before… those Teepees cost an arm and a leg so this could save someone a fortune! We have one we picked up in Aldi but I might just give this a go in the summer…
Thanks for sharing with #coolmumclub
Happy list 10 - family break, garden, #rockingmummylife - New Mummy Blog
March 17, 2017 at 1:01 pm[…] buy one, it just had to be made. I’ve written a step by step tutorial on how to make a toddler teepee […]
Annette, 3 Little Buttons
March 17, 2017 at 3:39 pmWow, this is brilliant! What a clever idea. They do tend to cost a lot if shop bought don’t you think. #TheLinkyList

Annette, 3 Little Buttons recently posted…#DreamTeam Linky 46
Alana - Burnished Chaos
March 17, 2017 at 4:38 pmWow, what a great idea. These are rediculously expensive to buy so making your own is ideal x

#TheListLinky
Alana – Burnished Chaos recently posted…10 Reasons Why I’m Rocking Motherhood
Madeline (This Glorious Life)
March 17, 2017 at 5:31 pmOh that looks really good! And seems pretty simple to put together. We have a pop up tent that my children both love! x #TheList
Helena
March 17, 2017 at 8:39 pmI’ve seen a few about but it’s often much better when it is made by the individual. #coolmumclub
Victoria - Lylia Rose
March 17, 2017 at 10:55 pmIt looks great! Perfect for warmer days in the garden too #thelistlinky
Helen
March 18, 2017 at 7:22 amYou make it sound very simple! I’ve been looking at these online and they are so expensive. I might try this when it warms up a bit for the garden. #coolmumclub
mainy
March 18, 2017 at 3:17 pmYou make this look totally do-able even for someone like me! Great concept and it looks fab:)
Mainy
#TheListLinky

mainy recently posted…How we got involved with the Great British Spring Clean #GBSpringclean
Easy toddler Valentine’s Day card - New Mummy Blog
January 31, 2019 at 2:00 pm[…] I’ve written quite a number of toddler crafty posts before including: how to make a toddler felt board, easy peasy hand and footprints, and a favourite make of mine, which H had great fun with, how to make a toddler teepee! […]